Did some really quick render test today with Mental Ray and Maya's ramp shader, definitely an improvement in terms of hardness of the edges over V-Ray. Soft edges can also be created too.
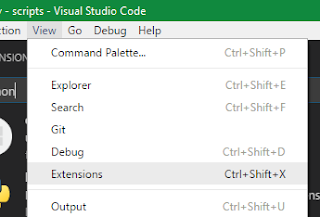
I've been testing debugging Maya Python scripts lately. Mostly focusing on free IDEs or editors such as PyCharm. So far this is one requires less setup in my opinion. This is mostly based off the remote python debugging functionality described here : Download and install Microsoft's free Visual Studio Code Install the official Python Extension Download ptvsd package as a zip Extract the ptvsd folder into your Maya scripts folder Open Maya and run (updated! Thanks Luciana !) import ptvsd ptvsd.enable_attach( address =( '0.0.0.0' , 3000 ), redirect_output = True ) Back in VSC, switch to Attach (remote debug) in the debug configurations and start it The editor should now look something like this You are now ready to debug. Note: here is the settings I use in launch.json Add break points, run your code and it should stop and populate the debug section of Visual Studio code when it hits a break point
Just quick adjustments the the force fields (turning down turbulence and keying various field's magnitudes) and changes to the custom aim expression/script. Still not convinced on the general behaviour of the butterflies, I think I will write my own flocking system to deal with them. At the current state, they are most useful for long shots and when the butterflies may need to collide with objects due to the use of nParticles. I think creating a custom flocking system will be to mainly provide a more realistic flight behaviour, with less sharp changes of direction which is an artifact of the current solution and also to allow for butterflies to follow and go to certain positions defined by the user. At the current moment I am unsure of how to do such things with nParticles and expressions.
Time for lightmapping the pesky meshes. The guides I'm going for are: 128 maps for the bigger environmental pieces 64 maps for the bigger props, maybe 128 in some 32 maps for the tiny props New set of UV for light map, copying from original texture UV then cutting them up more 2 to 3 pixel padding or spacing between each UV island, I'll go into more detail on how I do this automatically later If neighbouring faces is angled around 60 degrees or more, the UV edge between the faces will be split All islands fit in the UV space from 0 to 1 in U and V axis Video series I used by WorldofLevelDesign for light mapping principles, simple and short. He uses Maya too but I have my own twists on things My personal, more intuitive setup for the UV grid for 64px lightmap resolution (right click on the UV grid icon) Mainly use edge selection in the UV to cut rather than rumbling about with the mesh trying to cut edges After all the islands are cut up fo


Comments
Post a Comment